Monday, April 2, 2012

Mooney Falls Return Trip

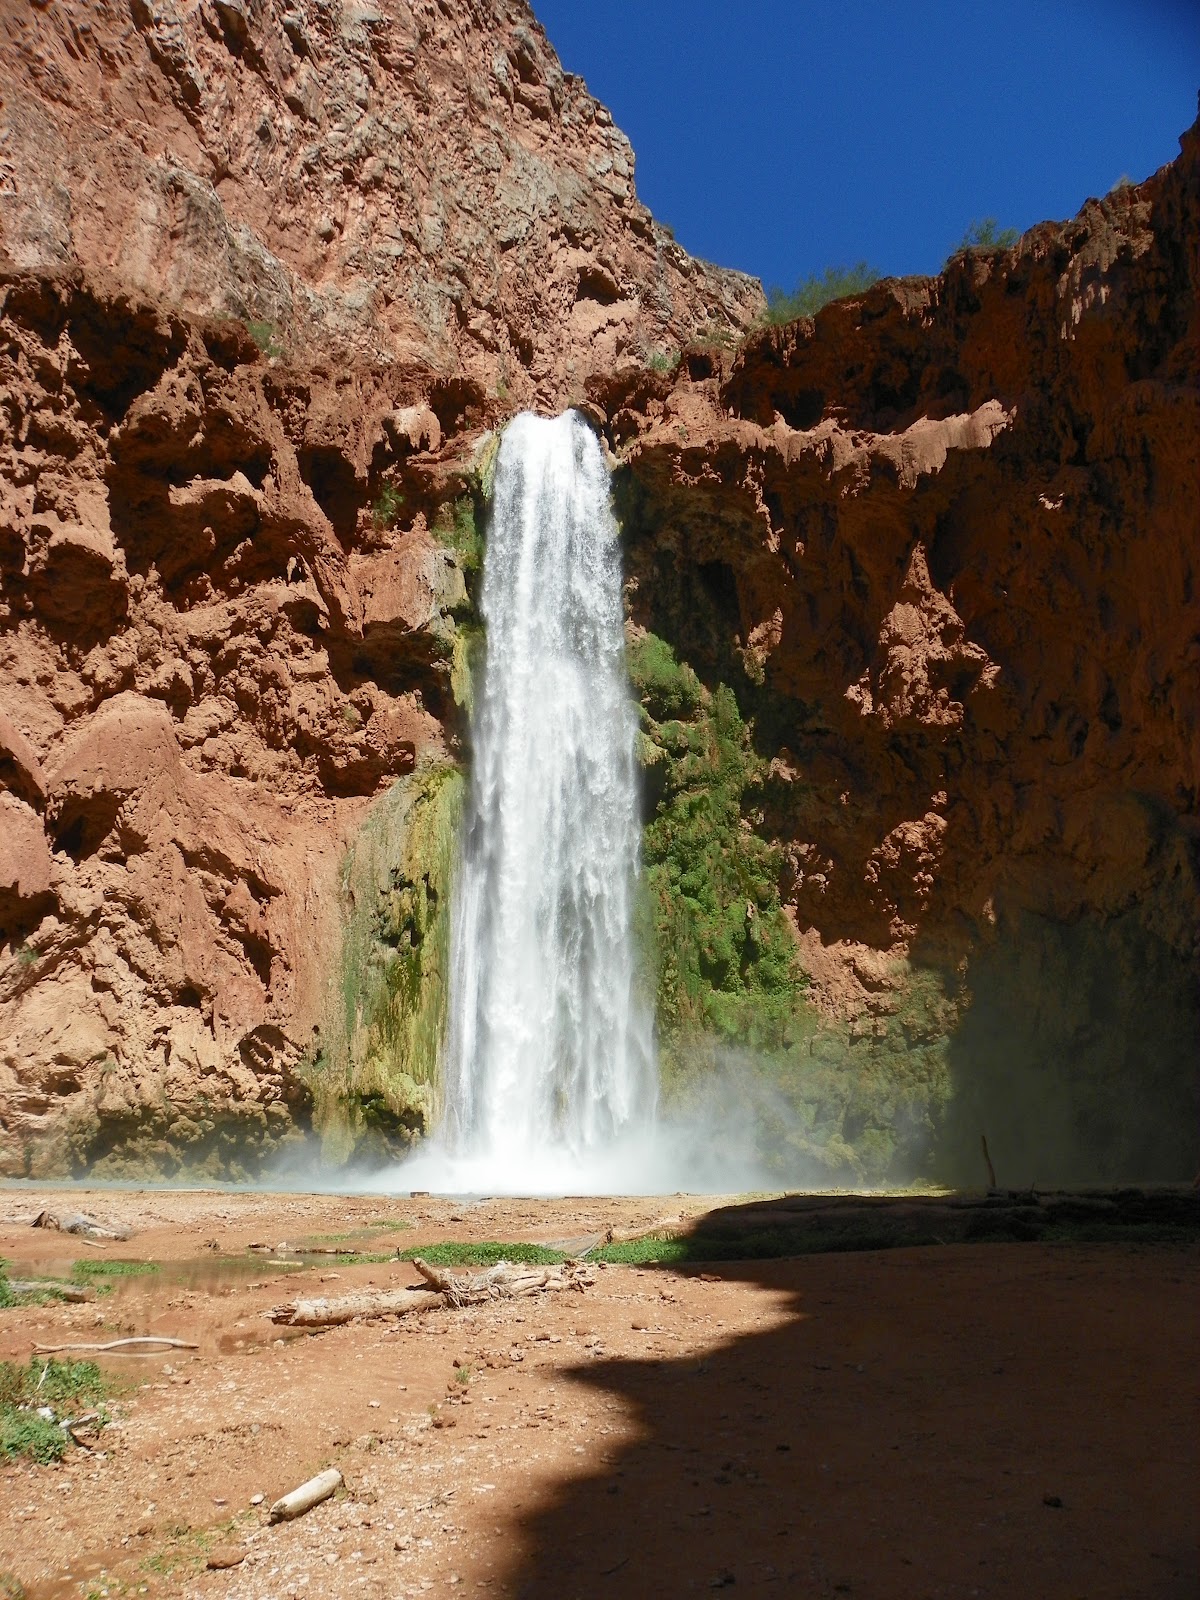
Downstream of Mooney Falls

Although getting to Mooney Falls was a 2.5 mile adventure, it was worth the harrowing climb down, and we had an enjoyable, leisurely stop at the 190' falls (http://alacartegreen.blogspot.com/Grand Canyon Havasupai Mooney Falls2012.html.)  We took lots of pictures, had a snack break, ventured downstream to explore, and the girls had some adventures with some frisky squirrels that they named "squirrel brothers".   We discussed continuing downstream another 3 miles further to Beaver Falls, but some of the troops were not willing to do the additional trek to less traveled areas :)  Once we had cooled off, and taken our fill of pictures, it was time to pack up our beach towels, dry off our feet, sprinkle on some foot powder, put the hiking boots back on, clip our water shoes onto our backpacks, and retrace our steps back up the cliff front to head to two more falls. 


Before ascending, check to make sure that there are no hikers descending.  Hikers cannot pass along

this section as there is only room for one person, so it is necessary to take turns descending and ascending.  After checking to be sure we could go up without meeting any other hikers, we climbed back up an aluminum ladder and then a series of wooden ladders.  It's important to be cautious on this section, being careful not to slip since the ladder surfaces and footholds get wet from the mist from the falls. After climbing the ladders, there is a very steep section along rough rock, and chains that are anchored to cliff walls with rebar and eye hooks, are key to making it up the rockface.  Without this chain and rebar for handholds and footholds it would almost impossible to ascend safely unless you are part monkey.  The trail continues and as on the way down, you must pass through two narrow, steep tunnels on your way up.   Once we made it back to the "descend at your own risk sign", we continued hiking back towards the Village of Supai, past the campgrounds, and continued to our next stop, Havasu Falls (Havasu Falls is approximately .75 miles upstream of Mooney Falls).  (July 14, 2011)

Although we weren't able to make a video of our ascent because we didn't have  any extra hands for the camera, and holding on tight and paying attention to our kids was a priority, check out this amazing YouTube video that another courageous soul made.  I'm still impressed with my kids for making this climb, they were beyond brave for 11, 13, 14.5, and 15.5 year olds!   If you are afraid of heights, this video may give that queasy feeling in your stomach that you hate, but I love this video.  It brings me back, and helps me recapture this incredible climb, and makes me want to go back and do it again!   Thank you to Crazyfinx for sharing it on YouTube, it's absolutely breathtaking!

Other links to check:http://alacartegreen.blogspot.com/2011/08/july-was-blur.html
and  http://alacartegreen.blogspot.com/2011/09/grand-canyon-adventures-continued.html
http://alacartegreen.blogspot.com/Havasupai Mooney Falls2012.html


Sunday, April 1, 2012

Tending the phlox

Creeping phlox in bloom at my house, April 2011
Leggy creeping phlox with brown areas


Gently pull on dead leggy sections
A little "hair cut" may be necessary for lush growth


So today it was a bit raw out, but spring was in the air, and I could see that some of my creeping phlox was beginning to show signs of buds awakening.   The prospect of my phlox budding was enough incentive for me to ignore the chill and get busy working in the garden.  And as always, there is tons of work to be done!

Part of today's job was to tend the phlox and get it ready for it's springtime show.  Tending the phlox sounds kind of biblical, doesn't it?


Well the bright blooms that grace my yard, are definitely gifts from God to be sure, and I look forward to the brilliant colors every year. 

My beautiful creeping phlox comes in several colors, light pink, hot pink, light purple, and medium purple and for me it is the highlight of my spring garden.  It's very hardy, and spreads easily via rhizomes or runners, and I usually try to break off some pieces and relocate it to other areas of the garden (gotta love rhizomes and perennials!)


Today the phlox needed some tending so that it would look it's showiest in the next few weeks. There are sections that drape over our timber retaining wall, and those sections sometimes get "leggy", or kinda gangly with brown patches.  I assume that parts of it get leggy as it flows over the wall because the rhizomes aren't in contact with the ground, and therefore can't put out roots into the soil to soak up nutrients.   


Trimmed and ready for the spring show!


Showy springtime creeping phlox 2011
Although some of the leggy parts are brownish and look dead, I've noticed that sometimes the ends of it are still perfectly green, and when I give it a "hair cut", the thin leggy pieces are still green inside the rhizome.  These brownish somewhat greenish leggy castoffs are often the perfect pieces to try to save since it's still alive.  I take the castoff cuttings to another section where I'd like to grow phlox, and pull back some dirt or mulch, pat it down, replaced the dirt and mulch and give it a drink.   If it takes great!  And if not, it was worth a try, and with the mulch in place you can barely tell.  In my experience, the odds are good that it will take, and next spring you'll have even more of this showy springtime wonder gracing your wall, border, or rock garden.  Happy tending and Happy Spring!


Friday, March 23, 2012

Tweet, Tweet!

No, I'm not talking about the 140 character or less posting, or update on Twitter.  I'm talking about the sounds of the birds that are twitter-patted and excited about the warm weather, building their nests, and mating.  As I was cleaning out a patch of garden yesterday, the sounds of the birds struck me, and made me smile even more.  To me, the sounds of birds herald spring, and this spring has come earlier than usual, with record 80+ degree weather here in the Boston area in March! March is the time of year I start to watch for my favorite bird, the Eastern Blue Bird. 

If you want to do something nice for the birds, and encourage them to come to your yard, why not put out some nesting material for them and help them along.  Nesting material can be as simple as grasses or material cleaned out of the flower beds, thread, string, dryer lint, bits of yarn, etc.   http://alacartegreen.blogspot.com/2010/04/for-birds.html

Tuesday, March 20, 2012

Grand Canyon - Havasupai's Mooney Falls

190' Mooney Falls
I was just looking through pictures from our spectacular vacation, and putting together a photo book and realized that I never finished writing about our Grand Canyon Adventures!  Not sure how I let that slip, but on any given day besides work, I'm helping, cleaning up after, distracted by, or chauffeuring 1, 2, 3, or 4 children, or any combination thereof.  At any rate, I'm going to do my best to catch up on the details of our trip:

After a 14 hour day touring Las Vegas, we checked out the Hoover Dam, and then spent 2 days at Grand Canyon West (GCW).  Although not as well known as Grand Canyon National Park, GCW is the home of the Hualapai Tribe http://alacartegreen.blogspot.com/2011/08/july-was-blur.html , and we recommend visiting.  During our visit, we were able to walk up to the edge of the canyon, look down into the canyon, and explore and take pictures without any railings to alter the views.  We saw gorgeous panoramic sunsets at Guano Point, sunrise outside of  our cabin door at Hualapai Ranch where we enjoyed archery, quick-draw, tomahawk throwing, roping, and horseback riding up to the rim of the Canyon.    

Hoover Dam
Sunrise at Hualapai Ranch cabins
At the edge of the Canyon, Guano Point

Sunset at Guano Point, Grand Canyon West


Horseback riding at Hualapai Ranch


Switchbacks as we descend from trailhead
The Canyon view as we hike
30' Rock Falls - Rosebud and Rhody jumped from the top!
After exploring at GCW, we continued east to the Grand Canyon Caverns.  We toured the caverns and after a hearty dinner in Seligman at Lilos, we settled in so we’d be ready for the next day.  After a 4am wakeup, we packed up and drove down dark, vacant Route 66 a short distance to get to the turnoff for the 62 mile ride to the trailhead, Hualapai Hilltop.  It was around 7am when we set out from the trailhead, and it was still cool.  We hiked into the Canyon, 8 long miles; the first 1.5 miles were steep switchbacks with loose footing, and it was cool since we were in the shade, and the sun hadn’t heated the canyon walls for the day.  As the trail leveled out, the terrain was less rough, and the “soil” was finer, looser, red sediment that has washed into the canyon over thousands of years.  Soon after we’d made it to level terrain, it began to heat up, and we trekked the rest of the way in the July heat continuously sipping the water from our Camelbacks which were nestled into our backpacks.  We stopped along the way for photos, for breaks and snacking on dried fruit, granola, and peanut butter crackers.  We reached the Village of Supai, home of the Havasupai Indian Tribe in about 4 hours. 


After resting and having lunch, and checking into the air conditioned Lodge, we decided to hike 1.5 miles further to Rock Falls, a 30 foot waterfall.  Rosebud and Rhody jumped from the top!  After picking up some pb and j, bread, cheese, nacho chips, salsa, crackers, and water (lunch and dinner supplies) at the General Store, a good night’s sleep, and a big breakfast at the Café, we decided to hike 2.5 miles to the furthest fall that we would visit, Mooney Falls, and then backtrack and enjoy two other falls as we made our way back. 


Getting to Mooney Falls is not a leisurely 2.5 mile hike, and it’s not for the faint of heart, or someone afraid of heights.  Mooney Falls, is the tallest of the Havasupai Falls at 190’ tall.  Getting to the base of the falls is tricky, because the trail winds down the face of a cliff, and then through a short tunnel.  The tunnel ends at a ledge that has a great view of the falls at about 120’ from the bottom.  There is a thick chain link “rail” to keep hikers from falling.  You don’t want to fall from here…Mooney Fall is named after a miner who fell to his death in 1882.  The trail continues in a second, narrow, steep tunnel that emerges about 80’ above the canyon floor.  At this point, there is a very steep descent along rough rock, and more chains that are anchored to cliff walls with rebar and eye hooks.  Without this chain and rebar for handholds and footholds it would almost impossible to descend safely.  Hikers cannot pass along these sections, there is only room for one person, and it’s necessary to take turns descending and ascending.  At about 15-20’ from the bottom there are old wooden ladders to make the final descent.  Hikers should note that the constant mist from the falls can make the climb dangerous and slippery.  But it’s so worth the adrenalin rush to get into the water at the base of the falls.  Due to the mist, it was tricky to take pictures without getting the camera wet, but we managed.  The water actually felt cool even though it was a hot July day because of the mist.  If you dared to get near the pounding water, it prickled the skin!  We explored downstream a bit, snacked, and jumped off some of the smaller falls there.  Be sure you remember to pack lots of water, snacks, sun screen, beach towels, and water shoes to keep your feet safe as you climb and jump from the falls.  You also might want to pack a small foot power to help dry off your feet before putting the hiking boots back on.  And as you can see, a camera is a MUST to capture the brilliant colors and beauty of Mooney Falls.


Hiking down to Mooney requires you to pass through narrow rock tunnels


Climbing up/down to Mooney Falls is a bit tricky!


Hang on tight to the ropes and wooden ladders

190' Mooney Falls


Monday, March 19, 2012

Declutter, reuse, fling

I've sung the praises of Marla Cilley, aka FlyLady of www.flylady.net on several occasions http://alacartegreen.blogspot.com/2010/08/j-is-for-junk.html, and tomorrow's mission of the day is to fling (or toss) some socks and pantyhose.  FlyLady's sidekick Kelly writes about the mission,
"You know that drawer that is full of old pantyhose and mismatched socks that you have held on to for reasons you don't even know. It is time to go through and toss, toss, toss. Be good to yourself and let go of these things that are cluttering up your bedroom. Hidden in a drawer or not, it is still clutter. Take 15 minutes and toss, toss, toss!"
But WAIT!!!  Before you toss those old socks, reuse them one more time!   I keep a few old socks stashed with the cleaning supplies for quick cleanup.  For example, I frequently use old socks to cleanup after our bulimic cat messes, then toss the mess and the sock without the guilt of wasting a paper towel.  I know, I know, that's gross, but I don't want that grossness touching my hand, and the sock is thicker than the paper towel and already destined for the trash.  Or...for a less gross cat related option, stuff an old sock with catnip, tie a knot and watch your favorite feline go nuts :)  Don't forget about your favorite canine...tie some old socks together to make a cheap dog pull.  Call Fido over for some tug-o-war and exercise your biceps!  

For other quick cleanups, I'll use an old sock on my hand as a dust mitt.  It works well to go along the baseboards, picture frames, etc.  Maybe you have some dusty or yucky messes you need to clean up without wrecking your sponges.  Old socks also make great shoe polishers, and after you use them to apply polish you can use them to shine the shoe too!

Similarly, before you toss the old pantyhose, reuse it for cleaning between rungs on chairs, or between tight spaces.  Have you heard of using pantyhose to help get paint into tight spaces between fences, or slats?  After cutting old pantyhose into strips, they can be used to tie up plants in the garden without harming delicate stalks, and the hose will give as the plant grows.  Then after you are nice and dirty from gardening, how about putting slivers of soap to use in a pantyhose leg, and tying it to the outdoor faucet for a washing station?   I've also placed an old pair of pantyhose on the end of the vacuum hose with a rubber band to keep it in place, to prevent sucking up Legos or other small items permanently (you know small things that might be in or under the couch that you don't want to loose forever).  

Declutter, reuse, fling.  Give it a try.  Get going with inspiration from Flylady to declutter those drawers 15 minutes at a time, then reuse those old socks and pantyhose for greener spring cleaning alacartegreen style, and then fling.  Declutter, reuse, fling, repeat!

Wednesday, February 8, 2012

Grapes

In the words of Ed Begley, Jr., "pick the low hanging fruit".  By that he means to make the easiest green changes first.  Well, today I sorta took that advice literally, yet by accident!  I chose Rainforest Alliance Certified http://www.rainforest-alliance.org/agriculture/certification red grapes at the grocery store.  They are delicious and nutritious, and by happenstance, they are also sustainable, which is of course a win/win for all.  I wanted to learn more about the Rainforest Alliance Certification, so I looked it up and was surprised to learn that more than two million farmers, farm workers, and their families directly benefit from the Rainforest Alliance Certification.  Rainforest Alliance Certification ensures that those who are certified address the three pillars of sustainability "environmental protection, social equity, and economic viability."  To become Rainforest Alliance Certified™, farms must be audited by the independent international certification body, Sustainable Farm Certification, Intl., which certifies to Sustainable Agriculture Network standards.  Oh, and did I mention, that the holey plastic bag (so that the grapes can breathe) is also recyclable #4 LDPE or Low-density polyethylene?  You can bet it will be returned to the grocery store on my next trip and placed in the recycle bin near the entrance door ;) 

Wednesday, November 30, 2011

Last Chance for Free Mulch!


Looking around there are many houses with their Christmas lights on, but here in New England we've been experiencing an unusually warm fall.  Just this week the temperatures have been in the 60s!  The freakishly warm weather allowed me the opportunity to get some yard work done this past weekend, get some fresh air, and get a dose of Mycobacterium vaccae, nature's prozac :)  http://alacartegreen.blogspot.com/2010/10/m-is-for-mycobacterium-vaccae.html   Besides continuing tree cleanup from the October storm that snapped the leaf laden trees like twigs, there was still raking to be done, and lots of general cleanup. As they say, a gardener's job is never done. 

What to do with all those leaves?  Don't bag them up and put them in the trash!  That's like throwing away a gift from nature, free mulch :)  When I have an area where I want to create or expand a flower bed, I simply rake the leaves to that area, and mound up a pile about 10-24".  I leave the leaves there over the winter, and the rain and snow pack down the leaves, and instead of having to remove grass to create the bed, the worms and leaves do the work for me.  In other areas, I use a thick layer of leaves to prevent weeds from growing, and it is one less area that we have to mow.  I also use leaf mulch around the base of trees.  As the leaves breakdown, they release nutrients into the soil.  During the winter months the leaf mulch helps to insulate the tree, and during the warmer months, the mulch helps to maintain moisture around the roots of the trees. 

Some gardeners choose to chop up leaves with a mower or leaf blower/vac.  If we happen to be mowing a section of the lawn, we take advantage of the leaves being collected and chopped.  Then we empty the bag with grass/leaves where we want it.  You can use a 3-4" layer of leaf mulch blanket to tuck in your perennials for the winter, and nourish the soil in preparation for springtime.  Don't forget to add some leaves to your compost pile while you're busy raking.  In fact, you might want to rake a small pile of leaves next to your compost bin, so that you can scoop some leaves on top of your "greens" each time, layering for optimum composting. 

If I'm lucky, the weather will hold, and I will be able to get back to the yard work, tuck in a few more newly  planted perennials for the winter, and get another dose of Mycobacterium vaccae.  I hope you'll take advantage of nature's free mulch gift too ;)   Happy raking!